Joomla! • View topic - GoDaddy "Free Hosting" Account and Joomla Install Now Works!

I was originally put aback by GoDaddy stating upon their website (; whilst trying to install their Joomla 1.5.9 version onto my web space) that Joomla was incompatible with their "Free Hosting" plan.

Well; needless to say, I was persistent in finding out why, and was able to finally complete a successful, and stable install onto my web space by uploading the core Joomla 1.5.9 release files which contain some minor ".css" modifications wherewith said modifications do nothing more than act as a method of disabling the "" object that GoDaddy injects into all resulting client side code.

GoDaddy MySQL 5.0 Database Setup:

AN IMPORTANT NOTE HERE: DO NOT ASSUME THAT FOR EVERY MYSQL DATABASE YOU SETUP UNDER YOUR GODADDY ACCOUNT THAT THE IP ADDRESS AND HOST NAME WILL BE THE SAME. THAT IS WHY IT IS VERY IMPORTANT TO KNOW WHAT IP AND HOST NAME YOUR DATABASE WILL BE ASSIGNED TO.

The (1st) first thing to do is setup your database at “GoDaddy” here: https://idp.godaddy.com/login.aspx?SPKey=GDMYAEB04&redirect=false&myaurl=%2fProducts%2fAccountList.aspx&ci=9008&product=hosting

Then (2) log in to your account using your GoDaddy account number or account name and password.
Image

Then (3) Click upon the "Manage Account" link for the domain name you wish to set the database up on.
Image

Then (4) click upon the dropdown for databases..
Image

Then (5) click upon the “MySQL” icon.
Image

Then (6) click upon the “Create Database” button near the
top – right of the page.

Image

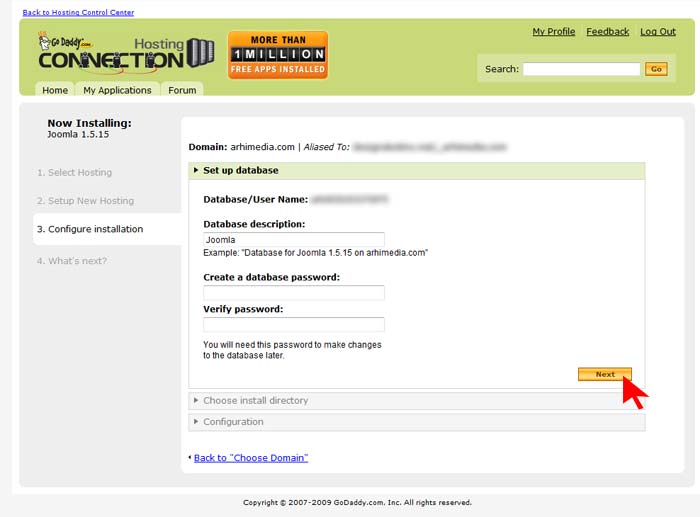
Then (7) click upon the radio button to select MySQL Version 5.0, then enter the description, database name and password. Write down this information (; you will need it for your Joomla! “configuration.php” file), then click upon the “OK” button.

Note: The “Database Name” and the “User Name” are the same when Joomla! logs on to the database.

Image

Then (8) you will see a screen like this stating that your database is “Pending Setup”.
Image

Then (9) (; after periodically refreshing [ F5 ] key) click upon the “Open Manager” link as shown. This will take you to the “phpMyAdmin” web interface in a new browser window.
Image

Then (10) log in to the “phpMyAdmin” database manager using your
database [DatabaseName] and [password].

Image

Then (11) focus your attention upon the following area of the resulting page –
(; after log in) and be sure the settings as indicated are the same.

Image

Then (12) we must determine “GoDaddy’s” host name for the server that your new database resides – upon because we cannot use an IP address in the “configuration.php” file.

To determine the host name for your database, we must copy the IP address (; yours may be different than shown) and paste it into a “DOS” or “Command Prompt” window. (; If you’d like, you could just write the IP address down, and type it in by hand).

Image

Then (13) open a “DOS prompt” window and type “ pathping [ space ] “, then [ right – click ] the “ DOS Window Title Bar ”, select “ Edit “, then “ Paste “ to insert the copied IP address from the previous step. Now press [ Enter ] on the keyboard.
Image

Then (14) after having pressed [enter] in the previous step, “pathping“ will determine the number of hops it takes to get to the “GoDaddy” server your database resides upon and will resolve the IP address you entered into a host name.
Image

Then (15) we need to copy the “Host Name“ and paste it into “Notepad“ for future reference when setting up our Joomla! “configuration.php“ file.
Image

Then (16) with the left mouse button; click, hold, and drag to highlight the host name as shown above.
Image
Image

Now paste the host name into your favorite text editor and save this file. Now your Database is setup and you should have recorded the database information as shown. Ignore the "ftp" information for now but if you know it, put it in.
Image

Tomorrow, we will unpack our Joomla! ver-1.5.9 files onto our P.C., do some modifications and upload everything to your GoDaddy web space.
Joomla! • View topic - GoDaddy "Free Hosting" Account and Joomla Install Now Works!: "- Sent using Google Toolbar"

Project AWARE Foundation: Grant Profiles

/assets/156_sfmisigns001.jpgMarina's and resorts across Fiji are taking the lead in shark conservation. The International Shark-Free Marina Initiative works with marinas, boaters and fishermen to develop policy designed to protect a vital component of the oceans health, our sharks. Thanks to funding from Project AWARE Foundation and under the leadership of Stuart Gow from Matava- Fiji's Premier Eco Adventure Resort, 13 marinas and fishing charters on Fiji's tropical islands have already signed their commitment.

The Shark Free Marinas program encourages shark conservation at sport fishing and resort marinas by prohibiting the landing of any shark at the participating facility. Fishermen are not allowed to bring caught sharks into the participating marina for any purpose.

Stuart Gow, Matava - Fiji said, "By asking vessels not to arrive at marinas with sharks we hope to encourage responsible sport fishing and ensure the future of healthy reefs and our islands. We look forward to signing up more marinas and charters in the coming months."

Joanne Marston, Asia Pacific Manager for Project AWARE added, "It's great to see so many marinas and fishing charters practice responsible fishing practices and pledge their commitment to shark conservation."


Project AWARE Foundation: Grant Profiles

Securing your Joomla! Website

Although by default the Joomla! core development team take great measures to ensure that there are few or no vulnerabilities in the code, there are a number settings which if not given due attention may leave your website vulnerable to attacks.

This article will give a list of measures to take to ensure a more secure Joomla! installation.Awesome list and very easy to follow!

Securing your Joomla! Website

How To Install Joomla through GoDaddy Hosting Control Panel

GoDaddy.com is #1 domain registrar and one of the most popular web hosting providers worldwide. Their prices are very competitive and you don't have to sign up long-term contracts. We experimented with this hosting provider for some time. Based on our experiences, we can say that GoDaddy Linux hosting packages are 100% compatible with Joomla. GoDaddy also have a way to install Joomla quickly for your hosting account. We will explain the procedure here in all possible details.

1. Login to GoDaddy.com GoDaddy.com and click Hosting from the left menu. Then click Manage next to your hosting account name. This will lead you to the hosting control panel.
2. In hosting control panel, under Content menu item, click GoDaddy Hosting Connection submenu link.
3. You are now on GoDaddy Hosting Connection page. Under Content Management menu item (left menu), click Joomla.
4. As you already know, Joomla is second to none! :) However, on the next page, you can see reviews about Joomla from other GoDaddy users. On this page, you can check if your GoDaddy hosting package is compatible with Joomla or not. If yes, you can proceed by clicking the yellow Install Now! button. Please wait several seconds until your request is processed.
5. Now, you see the list of your domains where you can install Joomla. Keep in mind that your account must have at least one free MySQL database available. Select desired domain and click Continue button.
6. On the next screen you should configure several options needed for your Joomla installation.
a) Set up database: GoDaddy automatically created database for you and assigned an user with the same name to it. So, you should only enter database pasword twice under this tab. Keep in mind that your password must be 7-14 characters long and have at least one uppercase letter, one lowercase letter and one number.
b) Choose install directory: Decide whether to install Joomla in a subdirectory on in the root. If you want to install in the root, leave this field empty, otherwise type subdirectory name. If you already have Joomla installed in the selected directory, it may be overwritten. Proceed by click on the Next button.
c) Configuration: Here you should enter information about your Joomla superadministrator's account. You need to enter superadministrator's username, password and valid e-mail address. For Joomla newbies, it is strongly recommended to install Joomla sample data, so leave the last option selected. Finally, click the Finish button.
7. You should get confirmation from GoDaddy that your Joomla installation has been requested successfully. Click My Applications link to check the status of your Joomla installation.
8. On the My Applications page, you should wait until status of your Joomla installation. Please wait until status is marked as Installed. This may take from several minutes to one hour, depending of GoDaddy's server. Once the status is marked as Installed, you can check your Joomla frontpage on www.yourdomain.com/joomla_directory and login to the Joomla backend panel on www.yourdomain.com/joomla_directory/administrator using superadministator's username and password that you set on Step 6c.
Conclusion:
  • GoDaddy is a hosting provider 100% compatible with Joomla (Linux packages)
  • It's possible to install Joomla easily through GoDaddy control panel

How To Install Joomla through GoDaddy Hosting Control Panel

How to make sure every browser loves your site | News | TechRadar UK

Building a great website is tough, but finishing the code and layout is only half the story. Too many sites have problems after going live because they weren't tested properly first.

Lots of things can and do go wrong, from poorly formatted code that some browsers choke on, to pages that break when opened on other platforms. If you developed your site on a Mac, what guarantee do you have that it'll look the same on a PC, for example?

Even now, when HTML structures are likely to be served as part of a CMS template system, it's important that all the basics are in place. You need a soak test: a checklist of crucial areas that you can test are working before the site goes live.

That's exactly what we've put together here. Follow our tips and your site will be as problem-free as possible.


How to make sure every browser loves your site | News | TechRadar UK

Go Daddy Hosting Connection - Joomla 1.5.15


Joomla 1.5.15
Technical Support
Joomla! is one of the most powerful Open Source Content Management Systems on the planet. It is used all over the world for everything from simple websites to complex corporate applications. Joomla! is easy to install, simple to manage, and reliable.

Go Daddy Hosting Connection - Joomla 1.5.15